Modular Waste Drain, 3-1/2 x 2 W/ Overflow, 1-1/2 NPT Ada
T&S Brass
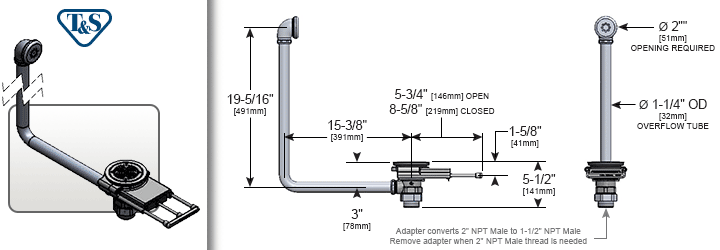
B-3990-01Modular push-pull waste valve for 3-1/2" sink opening with stainless steel body, 2" NPT male x 1-1/2" NPT male adapter, push-pull handle with chrome plated metal handle guard, 3-1/2" snap-in removable strainer and overflow tube with head assembly and cap. Certified to ASME A112.18.2/CSA B125.2
- Discharge Rate: 28.50 GPM max (107.88 L/min)
Downloads: Specifications | Installation

Modular Waste Drain, 3-1/2 x 2 W/ Overflow, 1-1/2 NPT Ada
|
SKU
|
Description
|
Quantity
|
|
|---|---|---|---|
|
|
More Info
Features & Benefits
- Modular push-pull waste valve for 3-1/2" sink opening w/ stainless steel body
- Modular design for easy installation and maintenance
- 2" NPT male outlet x 1-1/2" NPT male adapter
- Push-pull handle with handle guard to endure extreme abuse
- 3-1/2" snap-in removable strainer
- Overflow tube w/ head assembly and sealing cap
- Installation tool included
- 3" handle extension inlcuded
- Material: Stainless steel body, stainless steel flat strainer and chrome plated metal handle guard


| B-3990-01 | ||
01 |
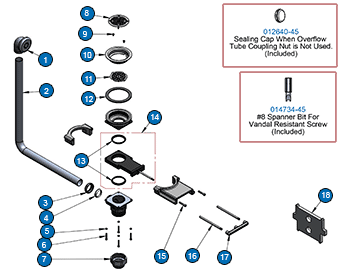
Overflow Tube Head Assembly | SKU: 011356-45 |
02 |
Overflow Elbow Tube | SKU: 011355-45 |
03 |
Coupling Nut for Twist Drain | SKU: 010391-45 |
04 |
Coupling Nut Ferrule | SKU: 010390-45 |
05 |
#10 Split Lock Washer | SKU: 018196-45 |
06 |
10-32 x 1-1/8" Socket Head Cap Screw (SHCS) | SKU: >017669-45 |
07 |
2" NPT x 1-1/2" NPT Adapter | SKU: B-3945 |
08 |
3-1/2" Removeable Snap-in Strainer | SKU: 010386-45 |
09 |
Vandal-resistant Stainless Steel Screw | SKU: 016654-45 |
10 |
3-1/2" Face Flange | SKU: 010384-45 |
11 |
3-1/2" Vandal-resistant Drain Guard | SKU: 017694-45 |
12 |
3-1/2" Face Flange Gasket | SKU: 010382-45 |
13 |
Valve Body Seal Kit (2/pkg) | SKU: 017698-45K |
14 |
Valve Body Assembly w/ 2 Seals |
SKU: 017219-45 |
15 |
1/4"-20 x 1-1/4" Stainless Steel Socket Head Cap Screw (SHCS) | SKU: 017454-45 |
16 |
Support Rod | SKU: 017451-20 |
17 |
Handle | SKU: 017448-45 |
18 |
Waste Drain Installation Tool | SKU: 017670-45 |
Modular Waste Drain Installation Instructions
Introduction
The Series B-3990 Modular Waste Drains are designed to fit sinks with a 3-1/2" drain opening. Versions with and without overflow tubes and various outlets adapters are available.
Series B-3990 Waste Drains operate by a push/pull motion of the handle to close and open the drain.
Features
- Low maintenance gate valve assembly
- Clear 2" diameter drain passage for fast draining and easy clog removal from sink
- Easy maintenance and replacement of service parts with out removal from sink
- Handle guard assembly for exposed applications for protection against damage from mop buckets, push carts, etc.
- Modular design for cofigurability and serviceability
- Optional handle length extensions available
- Vandal resistant drain guard provided to keep unsafe or unintended objects out of the drain passage
- Multi-purpose sink flange tool provided for easy installation

Installation
1. Remove the Snap-in Strainer and unscrew the Sink Flange Assembly from the Waste Drain Assembly. Apply a bead of Plumber’s Putty to the bottom of the Sink Flange Assembly where it contacts the sink bowl. (Keep the Drain Guard installed in the Sink Flange Assembly at all times. Remove it only when clog maintenance is needed and install it again when finished)
2. Make sure the underside and inside mating surfaces of the sink bowl in the area of the drain are clean.
3. Install the Waste Drain Assembly and Gasket from below the sink.
4. Install the Sink Flange Assembly thru the sink drain opening and screw it into the Waste Drain Assembly below.
5. Before tightening, position the waste drain Handle to the desired location. Tighten the Sink Flange Assembly securely with the Sink Flange Tool provided. (Figure 2)
(cont'd)
6. If Overflow is used (Figure 3) -- Install the Overflow Head in the sink. The modular design of the waste drain allows the overflow port on the Outlet to be positioned Left, Right or Back. To change positions, remove the (4) cap screws with a 5/32" hex key wrench and rotate the Outlet to the desired position. If the Outlet has been removed, ensure the Valve Seal is either in the Valve Body correctly or installed on the Outlet lip correctly. Install the (4) cap screws and tighten. Measure and cut the overflow tube to fit into the Overflow Head and Overflow Port on the waste drain Outlet. Install the Coupling Nuts and Seals on the overflow tube. Install the overflow tube and tighten the connections.
7. Connect the drain line to the waste drain Outlet. If Outlet Adapters are used, seal all threaded connections with pipe sealant.
8. Open and close the waste drain several times to check the operation. Check for leaks.


